Barnacle Buster Instructions: A Comprehensive Guide
This guide details effective barnacle removal utilizing the Barnacle Buster‚ addressing diverse surfaces and applications;
It encompasses preparation‚ operation‚ and post-removal care‚ ensuring optimal results and equipment longevity.
Microsoft’s advancements in AI chips‚ like Maia 200‚ parallel the need for efficient cleaning technologies.
Understanding Barnacle Growth & The Need for Removal
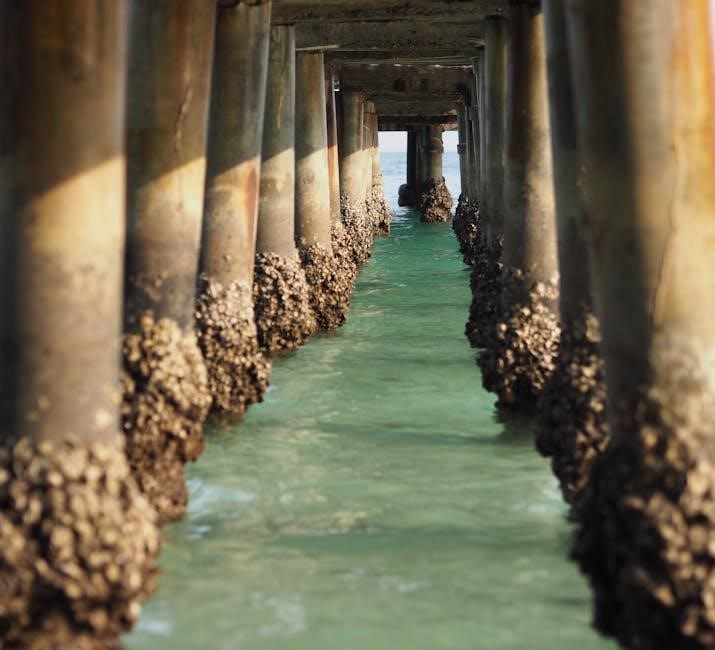
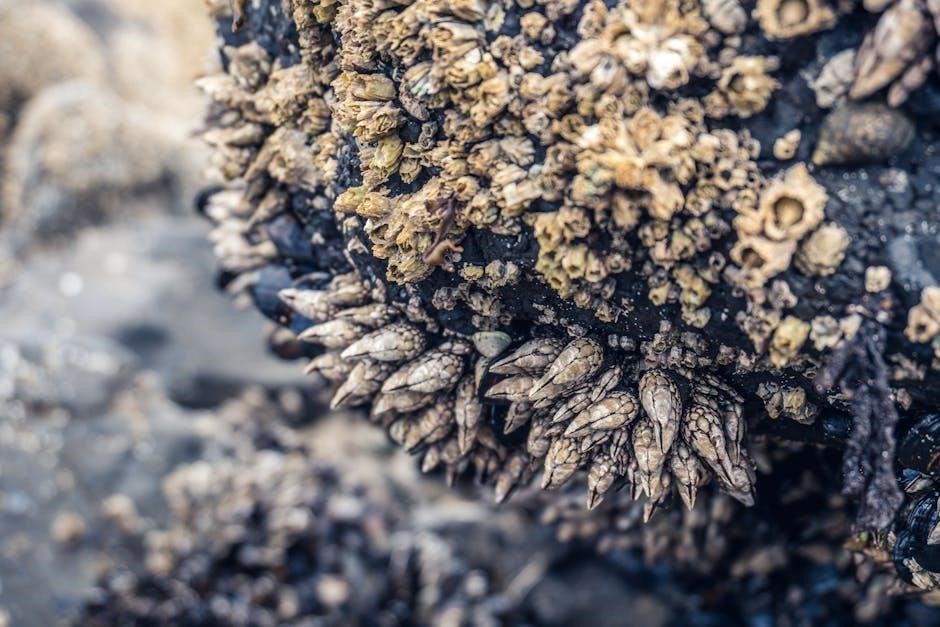
Barnacles are marine crustaceans that firmly attach themselves to submerged surfaces‚ including boat hulls‚ piers‚ and cooling systems. Their growth is a significant issue‚ leading to increased drag on vessels‚ reduced fuel efficiency‚ and potential damage to infrastructure. This tenacious adhesion is due to a powerful natural cement they secrete.
The need for removal stems from the economic and environmental consequences of barnacle infestation. Increased drag necessitates more fuel consumption‚ contributing to higher operational costs and emissions. In marine structures‚ barnacle buildup can cause corrosion and structural weakening. Furthermore‚ in cooling systems‚ barnacles impede water flow‚ reducing efficiency and potentially causing overheating; Regular removal‚ utilizing tools like the Barnacle Buster‚ is crucial for maintaining optimal performance and preventing costly repairs. Microsoft’s focus on efficient AI processing mirrors the need for efficient removal of marine growth.
What is a Barnacle Buster? – Types & Applications
A Barnacle Buster is a tool designed for the efficient removal of barnacles and other marine fouling from various surfaces. These tools range from handheld scrapers and brushes to more advanced high-pressure water jetting systems and ultrasonic devices. The core principle involves dislodging barnacles from their cemented attachment without damaging the underlying surface.
Applications are diverse‚ spanning recreational and commercial boating‚ marine infrastructure maintenance‚ and industrial cooling systems. Boat owners utilize Barnacle Busters to maintain hull speed and fuel efficiency. Marine engineers employ them for pier and piling cleaning‚ preventing corrosion. Industries rely on them to clear heat exchangers and intake pipes‚ ensuring optimal cooling performance. Like Microsoft’s Maia 200 chip designed for specific tasks‚ Barnacle Busters are specialized tools for a focused cleaning need.
Safety Precautions Before Using a Barnacle Buster
Prioritizing safety is paramount when operating a Barnacle Buster. Always wear appropriate Personal Protective Equipment (PPE)‚ including safety glasses or a face shield to protect against flying debris‚ gloves to shield hands from sharp edges and chemicals‚ and a respirator if dealing with potentially harmful substances or enclosed spaces.
Ensure the work area is well-ventilated‚ especially when using cleaning solutions. Be mindful of electrical hazards if using powered equipment‚ keeping cords away from water. Inspect the Barnacle Buster for any damage before use. Understand the specific hazards associated with the surface you’re cleaning – for example‚ lead paint on older boat hulls. Just as Microsoft focuses on secure AI implementation‚ meticulous safety protocols are crucial for effective and responsible barnacle removal.

Preparing for Barnacle Removal
Thorough preparation maximizes Barnacle Buster effectiveness. This involves gathering necessary tools‚ assessing infestation levels‚ and meticulously cleaning and inspecting the target surface beforehand.
Tools & Materials Required
Successful barnacle removal with a Barnacle Buster necessitates specific tools and materials. Firstly‚ a high-pressure water source is crucial‚ ideally a pressure washer capable of delivering adjustable pressure. Protective gear is paramount: safety glasses‚ gloves (heavy-duty‚ waterproof)‚ and potentially a respirator‚ depending on the environment and barnacle type.
Scrapers – both plastic and metal – are useful for dislodging stubborn barnacles; Various brushes‚ including stiff-bristled nylon brushes and wire brushes (for metal surfaces only!)‚ aid in cleaning. Cleaning solutions‚ specifically barnacle removal formulas or environmentally friendly alternatives‚ can enhance the process.
Inspection tools like flashlights and magnifying glasses help assess the removal’s completeness. For larger areas‚ extension wands or lances for the pressure washer are beneficial. Finally‚ consider having patching compounds or protective coatings on hand for post-removal surface treatment‚ preventing rapid re-growth‚ mirroring Microsoft’s focus on efficient systems.
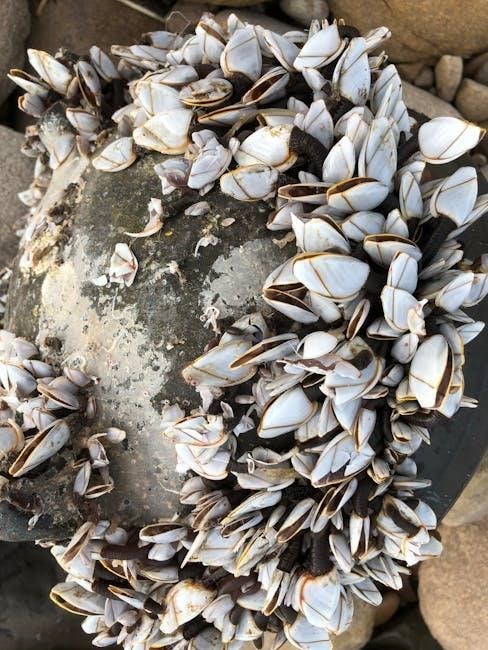
Identifying Barnacle Infestation Levels
Accurately assessing barnacle infestation levels is vital for effective removal planning. A light infestation features scattered barnacles with minimal surface coverage‚ often easily removed with moderate pressure. Moderate infestations exhibit denser clusters‚ requiring more sustained effort and potentially cleaning solutions. Heavy infestations present extensive coverage‚ potentially impacting surface integrity and demanding a multi-stage removal approach.
Observe barnacle size and maturity; larger‚ older barnacles are more firmly attached. Note the type of surface – fiberglass‚ aluminum‚ or steel – as this influences removal techniques. Consider the water conditions; areas with strong currents or warmer temperatures typically experience faster barnacle growth.
Like Microsoft’s AI chips analyzing data‚ a thorough inspection reveals the extent of the problem. Document the infestation level with photos for tracking progress and informing future preventative measures. This assessment dictates the appropriate Barnacle Buster settings and the time commitment required.
Surface Preparation – Cleaning & Inspection
Prior to Barnacle Buster operation‚ thorough surface preparation is crucial for optimal results. Begin by removing loose debris – seaweed‚ algae‚ and other marine growth – using a soft brush or low-pressure water spray. Avoid abrasive cleaners that could damage the underlying surface‚ especially on fiberglass or aluminum. A careful inspection identifies any existing damage‚ such as cracks or corrosion‚ which should be addressed before proceeding.
Ensure the surface is clean and dry to allow for proper adhesion of any subsequent protective coatings; Like the detailed medical dictionaries available‚ a precise assessment is key. Check for hidden barnacles in crevices or undergrowth.
This preparatory step‚ mirroring Microsoft’s chip calibration‚ maximizes the Barnacle Buster’s effectiveness and prevents further damage during the removal process. Document any pre-existing conditions with photographs for comparison after treatment.

Barnacle Buster Operation – Step-by-Step
Follow these steps for effective barnacle removal: calibrate the device‚ apply consistent pressure‚ work in sections‚ and rinse thoroughly. Like AI inference‚ precision matters!
Initial Setup & Calibration
Before commencing barnacle removal‚ proper setup and calibration are crucial for optimal performance. Begin by securely connecting the Barnacle Buster to its power source‚ ensuring a stable and reliable connection. Next‚ attach the appropriate nozzle or attachment head based on the surface you intend to treat – fiberglass‚ aluminum‚ or steel require different approaches.
Carefully review the manufacturer’s guidelines for recommended pressure settings. Start with a lower pressure and gradually increase it‚ testing on an inconspicuous area first to avoid damage. Calibration involves adjusting the flow rate and spray pattern to achieve the most effective cleaning action.
Similar to Microsoft’s Maia 200 chip optimizing AI performance‚ precise calibration maximizes the Barnacle Buster’s efficiency. Regularly check the nozzle for clogs and ensure all connections are tight. A properly calibrated Barnacle Buster will deliver consistent results and minimize the risk of incomplete removal or surface damage.
Applying the Barnacle Buster – Technique & Pressure
Effective barnacle removal hinges on mastering the correct technique and pressure application. Maintain a consistent distance of 6-12 inches between the nozzle and the infested surface. Employ a sweeping motion‚ overlapping each pass slightly to ensure complete coverage. Avoid dwelling on any single spot for too long‚ as excessive pressure can cause damage‚ particularly on softer materials like fiberglass.
Start with a moderate pressure setting and gradually increase it until barnacles begin to dislodge easily. For stubborn clusters‚ a slightly higher pressure may be necessary‚ but proceed with caution.
Much like the Maia 200 chip efficiently applies AI models‚ the Barnacle Buster requires a balanced approach. Angle the nozzle slightly to direct the spray towards the base of the barnacles‚ maximizing the lifting force. Consistent‚ controlled movements are key to achieving a thorough and damage-free cleaning process.
Working in Sections – Ensuring Complete Coverage
To guarantee comprehensive barnacle removal‚ divide the infested surface into manageable sections. This methodical approach prevents overlooking areas and ensures consistent treatment. Begin at the top and work downwards‚ allowing loosened debris to fall away from previously cleaned areas. Overlap each section by approximately 20% to avoid gaps and ensure no barnacles remain undetected.
Similar to how Microsoft’s AI chips process data in segments‚ tackling the surface in sections optimizes efficiency.
Regularly inspect each completed section under good lighting to confirm complete barnacle removal. Pay close attention to crevices and shadowed areas where barnacles tend to accumulate. This systematic process‚ combined with appropriate pressure and technique‚ delivers a thorough and lasting result‚ mirroring the precision of modern AI applications.
Specific Applications & Surfaces
The Barnacle Buster excels on boat hulls (fiberglass‚ aluminum‚ steel)‚ marine structures‚ and cooling systems. Its versatility mirrors Microsoft’s AI‚ adaptable to diverse tasks.
Boat Hulls – Fiberglass‚ Aluminum‚ & Steel
Fiberglass hulls require moderate pressure and a sweeping motion with the Barnacle Buster to avoid gel coat damage. Begin with a test area to determine optimal settings. Aluminum hulls are more sensitive; utilize lower pressure and ensure the Buster’s head maintains consistent contact to prevent gouging. Regularly inspect for any signs of etching or discoloration.
Steel hulls‚ often found on larger vessels‚ may have thicker barnacle growth. A more aggressive approach can be employed‚ but caution is vital to avoid pitting the steel. Pre-treating with a suitable marine cleaner can soften stubborn barnacles. Remember‚ like Microsoft’s AI chips optimizing performance‚ proper technique optimizes cleaning.
Always work in sections‚ overlapping passes to guarantee complete barnacle removal. Post-treatment‚ apply a marine-grade anti-fouling paint to inhibit re-growth‚ mirroring the protective measures needed for advanced technology.

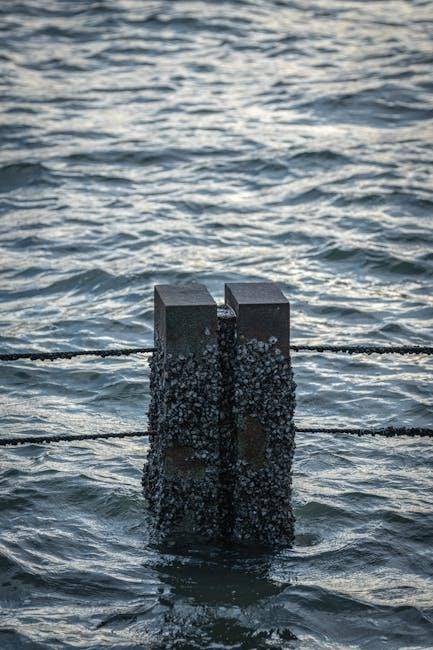
Marine Structures – Piers‚ Docks‚ & Pilings
Piers and docks‚ frequently constructed from wood‚ concrete‚ or steel‚ present unique challenges. Wooden structures require gentle pressure to avoid splintering; concrete can withstand higher settings‚ but avoid prolonged focus on one spot. Steel pilings‚ similar to boat hulls‚ benefit from pre-treatment to loosen barnacles.
When using the Barnacle Buster on these structures‚ prioritize safety. Work from a stable platform and wear appropriate personal protective equipment. Consider tidal fluctuations and potential obstructions. Like Microsoft’s Maia 200 chip optimizing inference‚ a systematic approach maximizes efficiency.
For heavily encrusted pilings‚ a multi-pass strategy is recommended‚ gradually increasing pressure. Post-removal‚ inspect for structural damage and apply a marine-grade sealant or coating to prevent future barnacle attachment and corrosion. Regular maintenance is key to longevity.
Cooling Systems – Heat Exchangers & Intake Pipes
Barnacle infestations within cooling systems – heat exchangers and intake pipes – drastically reduce efficiency and can cause costly damage. The Barnacle Buster offers a non-abrasive solution‚ minimizing risk to sensitive components. Prior to operation‚ completely isolate the system and depressurize it‚ adhering to strict safety protocols.
Utilize lower pressure settings and specialized nozzles designed for internal pipe cleaning. A slow‚ deliberate approach ensures thorough removal without compromising the integrity of the pipes. Similar to Microsoft’s AI chip advancements‚ precision is paramount.
Following barnacle removal‚ flush the system extensively to eliminate debris. Inspect for any signs of corrosion or erosion. Consider applying a bio-fouling inhibitor to prevent re-growth and maintain optimal cooling performance. Regular inspections and preventative maintenance are crucial for long-term reliability.

Post-Removal Procedures
Thorough rinsing and inspection are vital post-treatment. Apply protective coatings to inhibit regrowth‚ mirroring Microsoft’s AI model refinement for sustained performance and efficiency.
Rinsing & Cleaning the Treated Area
Following barnacle removal‚ a comprehensive rinsing process is paramount. Utilize a high-pressure water stream to eliminate dislodged barnacle fragments‚ debris‚ and any residual cleaning agents. Ensure complete coverage of the treated surface‚ paying particular attention to crevices and hard-to-reach areas where remnants may accumulate.
The rinsing should continue until the runoff water is visibly clear‚ indicating the removal of all loose particles. Subsequently‚ a mild detergent solution can be applied with a soft brush to further cleanse the surface‚ removing any lingering organic matter. This step is crucial for preparing the surface for protective coatings.
Similar to Microsoft’s focus on refining AI models like Copilot‚ meticulous cleaning ensures optimal adhesion and longevity of subsequent treatments. Avoid abrasive cleaners that could damage the underlying material; Proper rinsing and cleaning are foundational for preventing rapid re-colonization and maintaining a pristine surface‚ much like maintaining the efficiency of AI chips.
Inspection for Remaining Barnacles
A thorough inspection post-rinsing is critical to verify complete barnacle removal. Systematically examine the treated surface‚ utilizing bright lighting and‚ if necessary‚ magnification to identify any remaining barnacle fragments or newly settling larvae. Pay close attention to textured surfaces‚ seams‚ and areas previously heavily infested‚ as these are prone to harboring survivors.
Tactile inspection – gently running your hand over the surface – can reveal small‚ stubborn barnacles missed by visual assessment. Any detected remnants should be individually removed using a scraper or the Barnacle Buster at a reduced setting.
This meticulous process mirrors the iterative refinement seen in AI development‚ like Microsoft’s GPT-5.2‚ ensuring optimal performance. Addressing even minor infestations prevents rapid re-growth and maintains the effectiveness of protective coatings. Consistent inspection is key to long-term prevention‚ similar to maintaining the efficiency of AI silicon.
Protective Coatings – Preventing Re-Growth
Applying a protective coating after barnacle removal significantly inhibits re-growth‚ extending the period between necessary treatments. Several options exist‚ including anti-fouling paints containing copper or other biocides‚ and silicone-based coatings that create a slippery surface‚ hindering barnacle attachment.
The choice of coating depends on the surface material‚ intended use‚ and environmental regulations. Proper surface preparation – ensuring a clean‚ dry‚ and slightly abraded surface – is crucial for optimal coating adhesion.
Follow the manufacturer’s instructions carefully regarding application thickness and drying times. Just as Microsoft refines its AI chips like Maia 200 for peak performance‚ a well-applied coating maximizes its protective capabilities. Regular inspection of the coating’s integrity is recommended‚ repairing any damage promptly to maintain its effectiveness and prevent barnacle re-colonization.

Troubleshooting Common Issues
Addressing malfunctions and stubborn barnacles is key. Like resolving AI chip challenges—as seen with Microsoft’s Maia 200—persistence and proper technique are vital for success.
Barnacle Buster Malfunctions
Identifying and resolving Barnacle Buster malfunctions promptly is crucial for uninterrupted operation. Common issues include power supply failures‚ often indicated by a complete lack of response from the unit. Check the power cord and circuit breaker first.
Reduced pressure can stem from clogged nozzles or a failing pump; inspect and clean nozzles‚ and verify pump functionality.
If the unit vibrates excessively‚ ensure all components are securely fastened. Unusual noises might signal internal damage requiring professional repair.
Like troubleshooting advanced AI systems‚ such as Microsoft’s Azure Maia 200‚ a systematic approach is best.
Always disconnect the power before attempting any repairs. Refer to the manufacturer’s documentation for specific troubleshooting steps and diagrams. Ignoring malfunctions can lead to further damage and reduced effectiveness.
Dealing with Stubborn Barnacles
Encountering particularly tenacious barnacles is common‚ requiring adjusted techniques. Initially‚ increase the Barnacle Buster’s pressure incrementally‚ avoiding damage to the underlying surface. Prolonged application to a single spot can be effective‚ but monitor for overheating.
For extremely stubborn clusters‚ pre-treatment with a barnacle loosening solution can significantly aid removal.
Consider altering the nozzle angle to target the barnacle base directly. Similar to how Microsoft’s AI chips‚ like Maia 200‚ optimize performance‚ adapting your approach is key. Manual scraping with a plastic scraper after Barnacle Buster application can help dislodge remnants. Avoid metal scrapers to prevent surface scratching. Patience and persistence are vital; repeated passes may be necessary. Remember safety precautions throughout the process.
Environmental Considerations & Disposal
Barnacle removal generates waste requiring responsible handling. Avoid discharging removed barnacles and cleaning solutions directly into waterways. Collected debris should be disposed of in accordance with local environmental regulations – often this means landfill disposal or designated marine waste containers.
Many barnacle loosening solutions contain chemicals; consult the product’s Material Safety Data Sheet (MSDS) for proper disposal instructions. Consider using environmentally friendly‚ biodegradable cleaning agents whenever possible‚ mirroring Microsoft’s focus on sustainable AI practices. Minimize water usage during rinsing to conserve resources. Prevent runoff from contaminating surrounding vegetation or soil. Proper disposal protects marine ecosystems and upholds environmental stewardship.
Maintenance & Storage
Regular cleaning extends the Barnacle Buster’s lifespan. Rinse thoroughly after each use and store in a dry environment‚ protecting it from the elements and corrosion.
Cleaning & Maintaining Your Barnacle Buster
Consistent cleaning is paramount for optimal performance and longevity of your Barnacle Buster. Immediately following each use‚ thoroughly flush all internal components with fresh water to remove residual salt‚ debris‚ and dislodged barnacle fragments. Pay particular attention to nozzles‚ hoses‚ and any areas prone to buildup. Inspect hoses for cracks or wear‚ replacing them as needed to prevent leaks and maintain consistent pressure.
Periodically‚ disassemble easily accessible parts and soak them in a mild detergent solution to dissolve stubborn residue. Avoid harsh chemicals or abrasive cleaners‚ as these can damage sensitive components. After cleaning‚ ensure all parts are completely dry before reassembly. Lubricate moving parts with a silicone-based lubricant to ensure smooth operation. Like Microsoft’s focus on maintaining AI chip efficiency‚ consistent maintenance ensures your Barnacle Buster operates at peak performance. Regular upkeep prevents malfunctions and costly repairs‚ maximizing your investment.
Proper Storage Techniques
Correct storage is crucial to safeguard your Barnacle Buster from damage and ensure its readiness for future use. Before long-term storage‚ thoroughly clean and dry the unit‚ following the cleaning procedures outlined previously. Store the Barnacle Buster in a cool‚ dry‚ and well-ventilated area‚ shielded from direct sunlight and extreme temperatures. Avoid storing it in locations prone to freezing‚ as this can damage internal components.
Protect the unit from dust and debris by covering it with a breathable tarp or storing it in a protective case. If possible‚ hang the unit to prevent strain on hoses and connections. Disconnect and separately store any detachable accessories‚ such as nozzles or extension wands. Similar to Netflix’s secure data storage‚ proper storage protects your investment. Regularly inspect the stored unit for any signs of deterioration‚ addressing issues promptly. Following these guidelines will extend the lifespan of your Barnacle Buster and maintain its operational efficiency.
Extending the Lifespan of Your Equipment
Maximizing the longevity of your Barnacle Buster requires consistent preventative maintenance and careful operation. Adhere strictly to the manufacturer’s recommended maintenance schedule‚ including regular inspections and component replacements. Utilize genuine replacement parts to ensure compatibility and performance‚ mirroring Microsoft’s focus on optimized AI chip design. Avoid overexerting the equipment or using it beyond its specified capabilities.
Promptly address any malfunctions or unusual noises‚ as ignoring these can lead to more significant and costly repairs. Store the unit properly‚ as detailed in the storage section‚ protecting it from environmental factors. Like preserving medical dictionaries for continued reference‚ proper care sustains functionality. Regularly inspect hoses‚ connections‚ and nozzles for wear and tear‚ replacing them as needed. By implementing these practices‚ you’ll ensure your Barnacle Buster remains a reliable and effective tool for years to come‚ delivering consistent performance and value.